













Want to Teach STEM but Unsure Where to Start? A Five-Step Inquiry-Based Science Lesson
Teaching STEM does not mean starting with an experiment
Many teachers are required Teaching STEM, enhanced inquiry-based learning or organization discovery learning, but the instructions received sometimes only stop at very broad concepts. Teachers know that students need to experiment, ask questions, and solve problems, but are not clear on where to start, how to structure the lesson, and what evidence to rely on to evaluate whether students have truly understood.
Therefore, many STEM classes fall into two situations. One is that teachers spend a lot of time preparing materials, but the activities only create a sense of fun and are not clearly connected to scientific goals. Second, the lesson is still mainly explained by the teacher, then an illustrative experiment is added at the end of the lesson. Both methods can make students interested in a short time, but they do not necessarily form scientific thinking, data analysis ability and problem-solving ability.
One period Science inquiry-based effectiveness doesn't need to start with expensive equipment or a huge project. Teachers need a clear enough structure to lead students from curiosity to inquiry, from inquiry to investigation, and from data to grounded explanation. The 5-step roadmap below can be used as a practical framework for teachers when designing their first STEM lesson.
How is a fun STEM activity different from a targeted STEM lesson?
An activity like making a paper bridge, making a volcano erupt, or building a balloon-powered car can be very exciting. However, that activity only becomes a STEM lesson when students know what problem they are investigating, what knowledge they need to use, how to collect evidence, and how to explain the results using scientific arguments.
In other words, hands-on is not automatically synonymous with minds-on. Students may be busy cutting, pasting, and testing but still not understand why the product works. A quality STEM lesson usually requires at least the following components:
1. Yes clear learning goals, associated with a scientific concept or capacity that needs to be developed.
2. Start with actual phenomenon or problem, instead of starting with a list of knowledge to memorize.
3. Give students a chance question, predict, investigate, model and analyze data.
4. Ask students to create proof of learning, such as a model, data sheet, blueprint, or explanation.
5. Yes formative assessment for teachers to recognize whether students understand correctly, understand incompletely, or have misconceptions.
When these five components come together, STEM is no longer just a “special activity” that happens a few times a year. It becomes a way to organize Science lessons with goals, progress, and the ability to track student progress.
Step 1: Start with a real phenomenon or problem
Instead of opening with the sentence "Today we learn about friction", teachers can let students observe a phenomenon: why does a toy car go farther on a smooth table surface but stop quickly on the carpet? Why does the same amount of water but a cup placed in the sun warms faster? Why do some buildings withstand earthquakes better than others?
One anchor phenomenon needs to be close enough for students to feel involved, but also “difficult” enough for them to want to ask questions. The phenomenon does not have to be grandiose. A short video, an image, a real object in class, an unusual statistic, or a problem at school can all be a starting point.
Teachers should avoid explaining answers right at the beginning. The goal of this step is to activate background knowledge, reveal initial concepts, and create a need for exploration. Students can be asked to quickly write down three contents: What did you observe? What do you think is happening? What else do you want to know? These answers both create a voice for students and help teachers identify the initial level of understanding before implementing the activity.
Step 2: Turn curiosity into leading questions
After observing the phenomenon, students often ask many questions. The teacher's role is not to immediately choose a "correct" question, but to help the class turn discrete questions into one or several questions. Driving Questions can be investigated.
A good leading question usually cannot be answered with a simple “yes” or “no”. Questions should direct students to observe, compare, measure, build models or design solutions. For example, instead of asking “Does friction slow down a car?”, one could ask “How do different surfaces affect the distance a car travels?”
Teachers can classify students' questions into three groups to organize the lesson:
• Questions that can be investigated in class: can use materials, models, data or simulations to find evidence.
• Questions that need further research: needs to read scientific texts, watch videos, or find data from reliable sources.
• Extended question: cannot be solved during class but can be used for projects, homework, or follow-up activities.
This method helps maintain student agency because students' questions are recorded, and helps teachers control the scope of the lesson. Before turning to investigation, teachers should clearly define: what type of data students need to collect, what the final learning product is, and what criteria indicate that they are close to the answer.
Step 3: Organize investigation according to the 5E cycle
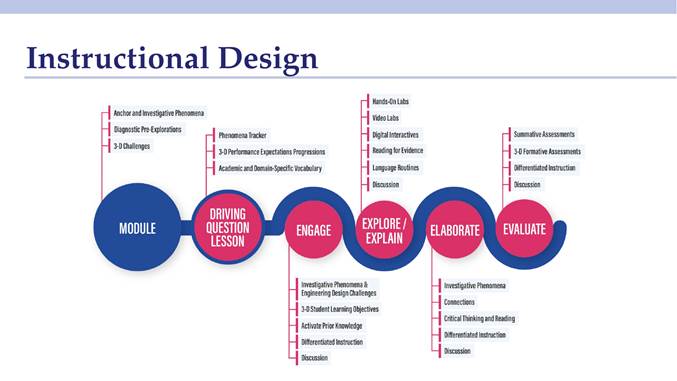
Cycle 5E consisting of Engage, Explore, Explain, Elaborate and Evaluate is a popular framework for designing exploratory lessons. The important point is that 5E is not five separate activities and does not have to be completed in one period. With a complex phenomenon, the cycle can last over many sessions.
1. Engage - Evoke: introduces the phenomenon, activates background knowledge, and acknowledges students' initial questions.
2. Explore - Explore: students observe, experiment, model, measure, or analyze data before receiving a complete explanation from the teacher.
3. Explain - Explanation: students present what they realize; Teachers help connect evidence to concepts and standardize science vocabulary.
4. Elaborate - Expand: students apply knowledge to a new situation, modify a model, or design a solution to a real-life problem.
5. Evaluate - Evaluation: teachers and students check understanding through responses, models, products, discussions, or short tasks.
In the Explore step, the teacher does not need to stand outside completely. Teachers can use leading questions such as “What factors are you controlling?”, “What does this data show?”, “Is there another explanation?” or “What more evidence do you need?”. This is a way to support thinking without taking away students' opportunities to explore.
When switching to Explain, let students speak first. If the teacher provides the entire concept from the beginning, the investigation can easily turn into an activity that confirms known answers. In contrast, when students must use observations and data to explain, scientific knowledge is formed from more meaningful experience.
Step 4: Combine hands-on, scientific text, video and numerical simulation for the right purpose
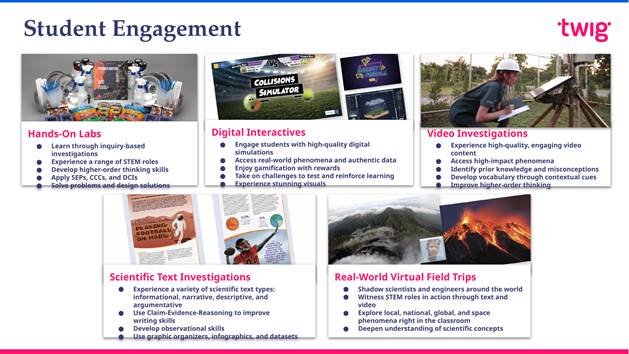
A STEM lesson does not require choosing between face-to-face and digital learning. The value lies in the fact that each form is used to solve a specific need. Hands-on lab is suitable when students need to manipulate, measure, experiment and see the effects of changing variables. However, not all phenomena can be reproduced safely or within the duration of a class.
Video investigation can take students to volcanoes, oceans, space, or professional laboratories. Digital simulation useful when the phenomenon is too fast, too slow, too large, too small, or has a high level of risk. Scientific text provides background information, data, opinions, and vocabulary for students to add evidence to what they observe.
Technology should only appear when it helps students see something difficult to observe, test a variable, access real data, or present their thoughts better. A long video without guiding questions can easily become passive viewing time. A nice simulation that doesn't require prediction and analysis is just "number decoration".
Before each resource, teachers can ask themselves three questions: What evidence do students need to find? What should you do with this information? Which product shows that children have processed information rather than just viewed or read it? When the purpose is clear, many forms of learning will complement each other and create an experience. multimodal learning really.
Step 5: Ask students to explain using Claim-Evidence-Reasoning
The end of the experiment does not mean the end of the learning process. Students need to translate data into a well-founded explanation. Frame Claim-Evidence-Reasoning (CER) helps teachers clarify this requirement and avoid the situation where students only describe what they did.
1. Claim - Conclusion: direct answer to the Driving Question or statement that the student wants to defend.
2. Evidence - Evidence: data, observations, model results, information from text or video relevant to the conclusion.
3. Reasoning - Reasoning: explain why the evidence supports a conclusion, based on a scientific principle or concept.
For example, students could make the claim that toy cars travel shorter on carpet surfaces. Evidence is the average distance measured over three trials. Reasoning needs to explain that the carpet surface creates greater friction, reducing the vehicle's movement faster. It is the reasoning part that shows whether students understand scientific mechanisms or just reread data.
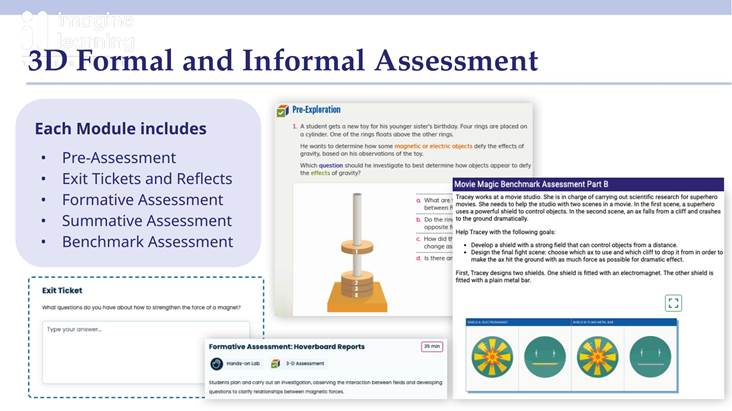
Teachers do not need to wait until the end-of-chapter test to evaluate. Formative assessment can take place through oral questions, observations of students designing investigations, model drawings, data tables, group discussions, exit tickets or a short CER. The goal is not just to score but to detect where students are getting stuck in order to adjust questions, supplement models, organize re-teaching or change the level of support.
An effective exit ticket can consist of just two sentences: “What is the most important evidence today?” and “What in your model needs to be changed after looking at the data?”. These two sentences help teachers see both knowledge and thinking processes of students.
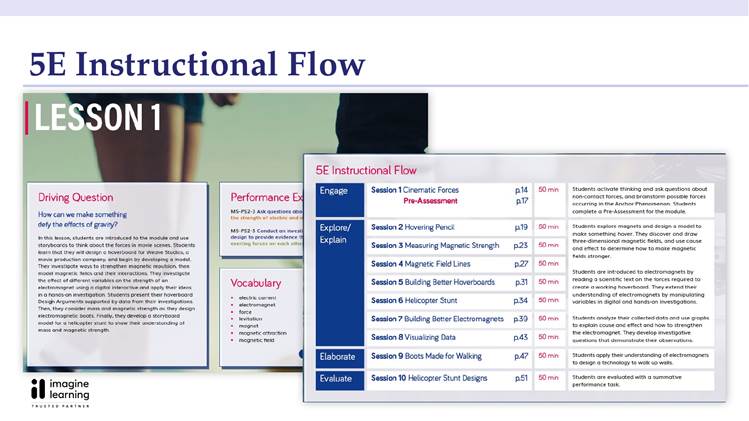
Suggested itinerary for a 50-minute Science inquiry-based lesson
With a simple lesson, teachers can allocate time according to the schedule below. This is not a set formula; Duration can be adjusted according to age, complexity of the phenomenon, and exploratory learning experience of the class.
1. 0-7 minutes: gives a real phenomenon or problem; Students observe and record their questions.
2. 7-12 minutes: select Driving Question, determine what needs to be learned and make an initial prediction.
3. 12-30 minutes: organize hands-on investigations, analyze data, read short texts or use numerical simulations.
4. 30-40 minutes: groups share findings; Teachers use questions to connect evidence to science concepts.
5. 40-48 minutes: students complete the model, solution, or Claim-Evidence-Reasoning paragraph.
6. 48-50 minutes: makes an exit ticket so teachers can determine what content needs to be reinforced in the next lesson.
For the lesson to operate smoothly, teachers should prepare in advance the objectives, opening phenomena, leading questions, the type of evidence to collect, plans to support students in difficulty and a short assessment task. Once these factors are clear, choosing materials or technology will become much simpler.
When teachers don't want to build the entire process from scratch
The biggest difficulty of STEM for teachers is often not about understanding the definition, but about the time it takes to translate the definition into lesson plans, resources, experiments, questions, rubrics and assessments. If each teacher has to find phenomena, test scientific accuracy, design labs and build assessments from scratch, the quality between classes will easily be uneven and implementation difficult to maintain long-term.
Therefore, when choosing a Science program, schools should consider not only the content of knowledge but also the implementation structure. A good support program needs to clearly show teachers the anchor phenomenon, Driving Questions, the inquiry cycle, the goals of each lesson, the multimodal resources and the learning evidence that needs to be collected. The teacher still retains the right to make adjustments, but does not have to start from a blank page.
How does Twig Science organize an inquiry-based lesson?
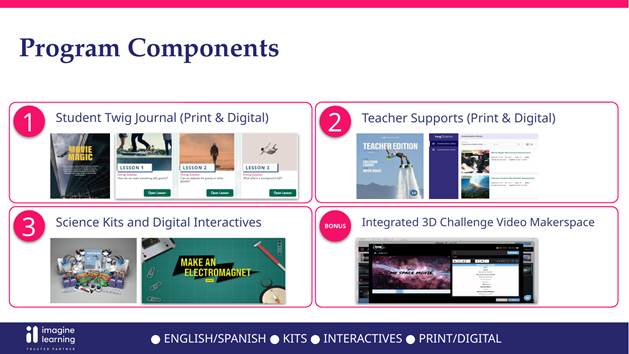
An example that can be referenced is Imagine Learning Twig Science. The program is built according to phenomenon-based and three-dimensional learning, in which each module starts with a real-life phenomenon or problem. Driving Questions continues to break down the problem, helping students step by step investigate, build models, analyze data, and complete explanations.
The lesson progress is organized according to the logic of 5E, and combines many forms such as hands-on labs, scientific text investigations, video investigations, digital interactions and STEM situations related to real careers. The important point is not the number of resources, but that the resources are placed in a progression with questions and goals, helping teachers know what students need to do before, during and after each activity.
Twig Science also integrates pre-assessment, exit ticket, formative assessment, performance task and benchmark assessment. As a result, teachers can track changes in students' thinking from initial conceptions to evidence-based explanations. With a multi-level class, the program provides multi-modal support and different approaches so students can express ideas through speaking, writing, modeling, drawing or hands-on activities.
Twig Science is suitable for which schools?
Twig Science may be suitable for international schools, bilingual schools or units that want to build a Science roadmap towards NGSS, inquiry-based learning and STEM but needs a consistent structure across grades. The program is especially useful when schools want to move from a content-memorizing way of teaching science to one where students explain phenomena, use Science and Engineering Practices, and solve real-life problems.
For teachers new to implementing STEM, lesson flow, Teacher Edition, digital platform, science kits and assessment system help reduce the time to build all the resources yourself. For professional teams, the common structure provides a basis for observing the classroom, agreeing on expectations, and discussing evidence of learning rather than simply checking how many pages a teacher has completed.
However, there is no program that completely replaces the role of teachers. The school still needs to determine the goals, duration, classroom conditions, ability to use English and professional development plan. Viewing demos or pilot implementations at several levels will help the team evaluate suitability before expanding.


.svg)